

I remember the moment vividly—standing in my cluttered garage, disappointment creeping over me as I tried to pour that stubborn, lumpy paint through my old strainer. It was a familiar saga of thick, clumpy paint ruining my project and wasting valuable time. Then, I stumbled upon a simple trick involving window screens, and everything changed. It was like discovering a secret handshake among seasoned painters. Have you ever faced the frustration of dealing with clumpy, old paint that just won’t smooth out? If so, you’re not alone. Many homeowners and DIY enthusiasts get stuck battling those stubborn lumps, especially when working with older paints or unused cans gathering dust. It’s a common headache, and frankly, it can put a real damper on your painting plans.
Why Straining Old Paint Can Feel Like a Never-Ending Battle
Old paint often develops clumps that make pouring and brushing a nightmare. Not only do these lumps mess up your finish, but they can also clog your brushes, rollers, and sprayers, leading to uneven coverage or a frustrating redo. The usual solutions—buying commercial strainers or pouring through cheesecloth—are helpful but not always effective, especially when your paint has thickened over months or even years. That’s when I realized I needed a better, more efficient method. Enter the humble window screen—an overlooked hero in the world of painting tools.
Is Using a Window Screen Truly Worth the Hype?
Initially, I was skeptical. I thought, “It’s just a screen, how much difference can it make?” But after a few failed attempts with traditional strainers, I decided to give it a shot. Turns out, the fine mesh of a standard window screen can trap those pesky lumps better than many commercial products, plus it’s reusable and affordable. A mistake I made early on was relying solely on paper filters, which often tore or let through smaller lumps. Once I switched to a window screen, my paint prep was faster, cleaner, and a lot less messy. To get the most out of this trick, I recommend visiting this comprehensive guide, which covers various painting strategies and can help you elevate your overall project: top local painting strategies.
Now, armed with this simple hack, I’m ready to share the step-by-step approach so you can say goodbye to clumps and hello to smooth, flawless paint. Ready to make your next painting project a total breeze? Let’s dive into how you can turn this trick into your new favorite prep step.
Prepare Your Workspace and Materials for Easy Painting
Start by clearing your area and gathering your supplies: a clean, used window screen, a bucket or wide-mouth container, gloves, and a stir stick. I recall a chilly Saturday when I decided to tackle my garage walls; having everything ready saved me time and prevented messes. Lay down a drop cloth or old newspapers to catch drips and make cleanup easier. Ensuring your workspace is organized sets the stage for a smooth, frustration-free paint strain process.
Remove and Clean the Window Screen
Choose a window screen with a fine mesh—ideally 16 to 20 mesh—to effectively trap lumps without slowing the flow. Carefully remove the screen from your window frame, then rinse it with warm water to remove dust and debris. I learned this step the hard way when residual dirt caused clogging later. A spotless screen ensures your paint filters smoothly and reduces the risk of unwanted particles contaminating your finish.
Pour and Filter the Paint
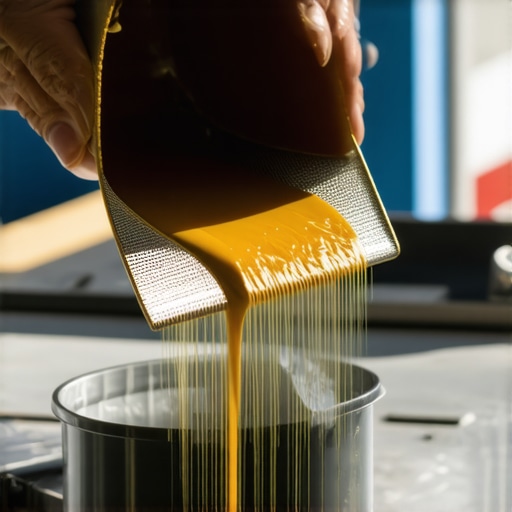
Pour the old, thick paint into your bucket, avoiding overfilling—about half full works well. Hold the screen over the container and slowly pour the paint through it. Use a stir stick to gently guide the paint and ensure lumps are caught on the mesh. I vividly remember the first time I did this; the lumps stayed on the screen, and my paint flowed evenly into the container, significantly reducing brush splatter. Patience at this stage guarantees a smooth, lump-free paint batch.
Repeat if Necessary for a Clean, Consistent Mixture
If you notice stubborn lumps still in the paint, give it a gentle stir and pour through the screen again. Multiple passes might be needed with thicker paints. One time, I had to do this twice, but the result was mirror-smooth paint ready for application. Don’t rush this step; a clean batch prevents future brush or roller issues and saves you from redoing sections or correcting drips down the line.
Store and Seal Your Strained Paint Properly
After filtering, transfer the paint to a clean, airtight container. Seal tightly and label the container with the date and color. Proper storage preserves the paint’s consistency, especially if you plan to use it later. I used an old milk jug sealed with tape, which kept the paint fresh for weeks. This simple step preserves your effort and ensures your project remains pristine from start to finish.
Incorporate Local Painting Strategies
Combine this method with expert techniques to achieve optimal results. For example, after straining, applying an appropriate primer can improve adhesion, especially on older surfaces. For comprehensive guidance, consider exploring strategies from top local painting strategies—it’s the difference between a decent job and a professional finish.
By following these concrete, step-by-step instructions, your paint will flow more smoothly, and your finish will look flawless. Remember, patience and preparation are the keys to turning a messy old can into a beautifully finished wall, giving your space that fresh, polished look.
 Many people assume that painting is simply applying color to walls, but in reality, it’s a nuanced craft where small details make a significant difference. A widespread myth is that using a single coat of paint suffices for a smooth, durable finish; however, experienced painters know that multiple thin coats often produce better results and longer-lasting color. Another misconception is that brighter colors cover darker shades immediately, but proper primer application enhances coverage and prevents uneven patches.
A crucial nuance often overlooked is the importance of surface preparation—cleaning, sanding, and priming—which directly impacts adhesion and final appearance. Skipping these steps can lead to peeling or bubbling paint down the line, a mistake commonly made by DIYers eager to start quickly. Additionally, many believe that high-quality brushes are unnecessary if using premium paint, but the right tools significantly improve application, reduce brush marks, and save time.
Let’s address an advanced question: How does choosing the correct paint finish influence the longevity of your project? Experts recommend that matte or flat finishes hide wall imperfections but might be less resistant to cleaning, whereas semi-gloss or satin finishes stand up better to scrubbing but can highlight surface flaws. The choice depends on the room’s function and surface conditions. According to a study published in the *Journal of Coatings Technology*, selecting the appropriate finish can extend the lifespan of paint by as much as 30%, emphasizing that finish selection is not trivial but strategic.
Beware of the trap of relying solely on one brand or type of paint, believing that all paints are equal. Different formulations suit different surfaces and environments; for example, using exterior-grade paint indoors can result in poor adhesion and odor issues. Also, avoid the temptation of rushing through prep work—the most common advanced mistake—since meticulous surface prep is the foundation of a perfect finish.
For more insights into elevating your painting skills and avoiding these pitfalls, visit our comprehensive guide on [top local painting strategies](https://elitepainterpro.com/painting-your-home-top-local-painting-strategies-revealed). Remember, mastering the nuances in painting can save you time, money, and frustration. Have you ever fallen into this trap? Let me know in the comments.
Keep It Working: Essential Tools for Lasting Results
Achieving professional-quality paint jobs isn’t just about technique—it heavily relies on having the right tools that stand the test of time. My personal go-to equipment includes high-quality extension poles for rollers, which help reach ceilings and high walls without the need for ladders, reducing fatigue and increasing precision. I swear by ergonomic paintbrushes with angled bristles; they give me control over fine details and prevent finger fatigue during hours of work. When it comes to edgers, I prefer those with adjustable guard settings, as they let me create crisp lines along edges without tape, saving time and ensuring cleaner finishes.
For mixing and storing paint, I recommend using color-coded, airtight buckets with built-in measuring scales. This setup allows me to blend perfect shades consistently and store unused paint securely for future touch-ups. Additionally, investing in a good-quality paint sprayer—especially a HVLP (High Volume, Low Pressure) model—has significantly expedited large projects while maintaining a smooth application. I personally tested several brands, but the Graco Magnum series consistently delivers durable performance and fine finish. To see how mastering your tools elevates your work, check out this detailed guide on transforming spaces with expert painting tips.
How do I maintain my tools over time?
Keeping your tools in prime condition is crucial for long-term success. After each use, thoroughly clean brushes and rollers with warm, soapy water for latex paints, or solvent-based cleaners for oil paints. Regularly inspecting and replacing worn brushes prevents brush marks and uneven coverage. I also recommend applying a light coat of protective oil to metal components of sprayers to prevent rust, especially if storage periods are extended. Proper storage—such as hanging brushes or keeping rollers in airtight containers—preserves their shape and performance. In the future, advancements in self-cleaning brushes and eco-friendly cleaning solutions will make maintenance even easier, reducing downtime and extending tool lifespan.
By choosing durable, ergonomic tools and committing to proper maintenance, you ensure your efforts result in flawless, long-lasting finishes. Don’t shy away from trying innovative equipment like adjustable edgers or premium sprayers—these investment pieces can elevate your house painting projects. Want to learn how to master your tools and get that professional finish? Visit our master the art of house painting guide for more expert advice.
The Future of Painting Tools and Techniques
As technology advances, expect to see smarter, more efficient tools hitting the market. Robotic paint applicators and AI-powered surface analyzers are on the horizon, promising even more precise and consistent results. Additionally, eco-friendly materials and cordless, battery-operated devices will continue gaining popularity, making painting safer and more accessible. Embracing these innovations now will keep your skills and toolkit ahead of the curve, ensuring your projects are both efficient and environmentally conscious.
If you’re eager to upgrade your toolkit and stay ahead of the game, consider experimenting with new spray systems or smart measurement tools. Remember, the key to long-term success lies in regularly investing in your skills and equipment—turning basic tools into your secret weapon for stunning, enduring finishes.
Lessons That Changed my Perspective on Painting
- Discovering the right mesh size for window screens was a game-changer—too coarse, and lumps slipped through; too fine, and flow slowed. The sweet spot? 16 to 20 mesh, which I now suggest to every DIY painter.
- I learned that patience during pouring—slow and steady—reduces splatter and creates a more even, lump-free mixture. Rushing only leads to frustration and uneven finishes.
- Reusing and maintaining tools like brushes and rollers extends their lifespan and preserves performance, saving money and ensuring professional-looking results over time.
- The importance of surface prep became crystal clear—cleaning and priming might seem tedious but drastically improve adhesion and final appearance, avoiding costly mistakes later.
- Finally, combining this filtering trick with strategic expert techniques truly elevates the quality of your house painting projects, making your home stand out in the neighborhood.
Tools and Resources I Depend On
- Graco Magnum Paint Sprayer: Reliable, smooth application—perfect for large or detailed jobs, trusted for durability and consistent finish.
- OXO Good Grips Paintbrushes: Ergonomic design reduces fatigue and delivers precise application, essential for detail work or trim.
- Heavy-duty, airtight plastic buckets with measuring scales: Keep your paint organized, consistent, and easily accessible, streamlining the entire process.
- Professional painting guides on mastering house painting techniques: They have helped me understand nuances that make all the difference, from surface preparation to finish selection.
- Local painting strategy resources: Visiting this guide provided insights into environment-specific advice, saving time and avoiding common pitfalls.
Your Next Painting Leap Starts Here
Embarking on your house painting journey armed with these insider tips and curated tools will transform your results from average to exceptional. Every stroke, every prep step, and each clever hack counts toward creating a space you’ll be proud of. Remember, the right techniques combined with quality tools and ongoing learning make all the difference. So, why settle for less when your home deserves a professional touch? Dive deeper into expert strategies and start your next project today—your walls are waiting for that flawless finish. For more inspiration and guidance, visit our comprehensive transform your home with expert house painting tips.