

I’ll never forget the morning I sat down with my coffee, glanced at the south-facing window in my den, and felt a pit in my stomach. What used to be a crisp, clean surface looked like a piece of parched desert earth. Those tiny, jagged fissures weren’t just an eyesore; they were a sign that my previous weekend quick fix had failed miserably. I’d fallen into the classic trap of thinking a thick layer of paint would hide the flaws beneath. It didn’t. In fact, it just made the peeling more spectacular. If you’ve ever found yourself staring at a window sill and wondering why the heck your hard work is literally falling apart, I’ve been there, and I know exactly how to fix it. Today, we’re going to stop the rot and get those sills looking sharp again.
Why Your Window Sills Keep Failing You
The harsh truth is that window sills are the hardest-working part of your interior trim. They deal with extreme temperature swings, condensation from the glass, and the relentless UV rays of the afternoon sun. I learned the hard way that the reason you should never paint over peeling paint is that you’re essentially building a house on quicksand. My biggest mistake early on? I assumed the wood was just thirsty and needed more paint. I didn’t realize that moisture was trapped underneath, and according to the USDA Forest Products Laboratory, wood can expand by as much as 10% in width when it absorbs moisture. That movement is what snaps your brittle paint film. You can’t just cover it; you have to treat the cause.
Can a DIYer Really Get a Professional Finish?
You might be thinking that this sounds like a job for a crew with a five-figure quote, but I promise you it isn’t. When I first started tackling my own exterior paint flaking only on the window sills, I was terrified I’d ruin the wood. But once I understood that mastering the art of house painting is 90% preparation and 10% brushwork, the fear vanished. Have you ever tried to patch a crack only to have it reappear three months later? Tell me I’m not the only one who has wasted a Saturday like that! The secret isn’t more paint; it’s the right foundation. Often, why using the wrong primer causes your trim paint to chip comes down to flexibility. You need a system that moves with the wood, and that’s what we’re diving into.
Scrape Until You See the Grain
The first step is always the hardest, both physically and mentally. You have to be ruthless with that scraper. If you leave even a tiny island of loose paint, your new coat will eventually pull it away from the wood. I remember one specific project in a sunroom where I thought I could save time by just sanding the rough spots. Ten minutes after I started, the heat from the sander actually softened the old oil-based layers, turning the whole thing into a gummy, gray mess. I ended up spending three times as long cleaning my sanding pads as I would have if I’d just used a sharp carbide scraper from the start. You need to strip it back until you reach stable material. This is especially vital because why your exterior window trim is rotting under the paint often starts with these small interior failures that let moisture seep into the core of the wood.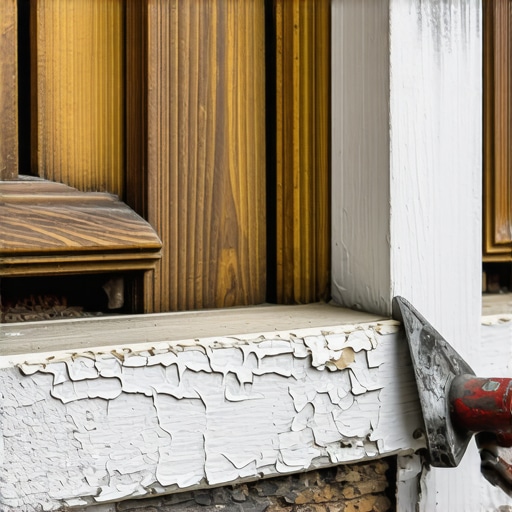
How to Fix Those Annoying Dents Before You Paint
Once the wood is bare, you’ll likely see decades of battle scars from flower pots, pets, and dropped keys. Don’t just slap paint over these craters. If you have deep gouges, use the hammer and cloth trick for fixing dented trim before painting to steam the wood fibers back into place. For anything deeper, a high-quality wood filler is your best friend. Sand the filler flush with the wood once it’s dry. If the wood feels cool or slightly damp to the touch, stop. Just like learning how to tell if your drywall is too damp for the first coat, you need to ensure the wood moisture content is low, or you’re just trapping the very thing that causes peeling in the first place.
The Primer Choice That Stops the Peeling Cycle
This is where most DIY projects fail. You cannot use a standard wall primer on a window sill and expect it to hold up to the sun. You need a high-adhesion, slow-drying oil primer or a specialized water-based bonding primer designed for high-traffic trim. This layer acts as the glue between the substrate and your finish. Think of it like a foundation for a house; if it’s weak, the whole structure eventually cracks. When local painting secrets elevate your space effortlessly, it’s usually because the pro didn’t skip the 24-hour cure time for the primer.
Nail the Application Without Making a Mess
When you finally reach for the topcoat, use a 2-inch angled sash brush. This is the only way to get a sharp line between your wall and woodwork without relying heavily on tape. Apply the paint in long, smooth strokes from one end of the sill to the other. If you see a drip, don’t panic. You can learn how to fix a run in your paint without starting over by letting it dry slightly and then carefully leveling it with a razor, but it’s better to use less paint on your brush and apply two thin coats rather than one thick, saggy one. The thinner coats will cure harder and resist the ‘blocking’ or sticking that happens when you close the window later.There is a persistent myth in the DIY world that more is better. I see it all the time: homeowners applying layer after layer of paint, thinking they are creating an impenetrable shield. But here is the contrarian truth: a thick paint film is actually your worst enemy on a window sill. According to the Painting and Decorating Contractors of America (PDCA), excessive film build reduces the coating’s ability to flex with the natural expansion and contraction of the wood. When the paint gets too thick, it becomes brittle, and that is when the cracking begins. If you have been piling on the coats to save the wood, you are likely accelerating the failure. This is often the difference between contractor-grade and premium paint; the latter is designed to remain flexible even at lower film thicknesses.
Why Does Premium Paint Still Fail on Your South-Facing Windows?
It is a frustrating scenario. You spent a fortune on a gallon of top-tier acrylic, yet six months later, it is bubbling. The nuance here is heat absorption and the thermal stress on the substrate. Darker colors on south-facing sills can reach temperatures exceeding 150 degrees Fahrenheit in direct summer sun. This heat does not just fade the color; it actually cooks the resin in the paint, causing it to lose its bond and pull away from the wood. This is often why your local painting estimates vary so wildly in price—a true pro knows to suggest light-reflective colors or specialized heat-reflective coatings for those specific high-exposure areas. One major oops factor I have learned the hard way involves the difference between dry and cured. You might think your sill is ready for that heavy flower pot after four hours because it feels dry to the touch. It is not. Most modern water-based paints take up to thirty days to fully cross-link and reach their maximum hardness. If you put a heavy object on it too soon, you will experience blocking—where the object sticks to the paint and rips the finish off when moved. This is a classic example of why the 48-hour rule for moving furniture back against new walls is a bare minimum, not a target. Deep down, local painting secrets elevate your space effortlessly because they account for the micro-climate of your home. If your sills are failing, do not just reach for a brush; look at the moisture levels and the orientation of the window. Have you ever fallen into the trap of thinking a second coat would fix a peeling problem, only to have it peel even worse? Let me know in the comments. By focusing on mastering the art of house painting through science rather than just sweat, you will finally break the cycle of seasonal repainting.
Invest in the Gear That Separates Amateurs From Pros
I used to think my old putty knife was enough, but if you want to unlock the power of professional painting for a stunning home, you need a carbide-tipped scraper. Unlike cheap steel blades that dull in minutes, carbide stays sharp for months, slicing through old lead-based layers like a hot knife through butter. But the real game-changer in my kit? A digital moisture meter. I never touch a brush to a sill now until I’ve verified the wood is below 12% moisture. If you’re just guessing, you’re essentially gambling with your Saturday. This precision is mastering the art of house painting at its highest level. You aren’t just slapping color on; you’re managing the chemistry of the substrate.

How do I keep my window sills from failing over time?
Maintenance isn’t about repainting every two years; it’s about inspecting the ‘seal’ of your home. Every spring, I take a damp microfiber cloth to my sills to remove the winter’s grime. Dirt is abrasive and can micro-scratch your finish, leading to those first tiny cracks. While you’re cleaning, look at the joint where the sill meets the window frame. If the caulk is pulling away, stop and fix it immediately. I’ve seen so many homeowners wonder why your exterior caulk is falling out of the gaps already, and it’s usually because they used a cheap, non-flexible filler that couldn’t handle the window’s vibration. Use a high-quality elastomeric sealant that can stretch 500% without breaking. This small check-up is the secret to how to maintain your newly painted exterior for ten years or more.
The Future of Home Coatings is Getting Smarter
As we look toward expert house painting advice for 2025, we are seeing a massive shift toward hybrid water-alkyd resins. These give you the rock-hard finish of an old-school oil paint with the ease and low-VOC cleanup of water-based products. According to the American Architectural Manufacturers Association (AAMA), the move toward high-reflectivity coatings is no longer just for commercial roofs; it’s coming to residential trim to combat the increasing UV intensity we’ve seen lately. By choosing these advanced formulas now, you are future-proofing your home against the elements. If you want to take your DIY game to the next level, I challenge you to go buy a moisture meter before your next project. It is the single best way to ensure your paint actually stays where you put it. Don’t just work harder; work with the data that pros use every single day.
What My Most Expensive Failures Taught Me About Trim
One thing I realized after years of repainting the same windows is that wood is alive and it breathes. If you treat it like plastic, it will fight back. I’ve learned that the reason you should never paint over peeling paint isn’t just about aesthetics; it’s about structural integrity. My lightbulb moment came when I stopped trying to save 15 minutes by not sanding between coats. That tiny bit of tooth you create is what prevents the shelf-peeling effect where the topcoat just slides off the primer. Also, never underestimate the power of a clean surface because dust is the invisible barrier that ruins your hard work. By focusing on top local painting strategies revealed by pros, I finally realized that the quality of the finish is directly proportional to the time spent on the edges where the wood meets the glass.
The Gear I Actually Use Every Saturday
If you want to unlock the power of professional painting for a stunning home, you have to stop using the tools they sell in the bargain bin. I swear by my 2-inch carbide scraper which stays sharp long enough to finish an entire house of sills without a blade change. I also never start a project without a digital moisture meter because knowing the moisture content saves me from the heartbreak of exterior paint flaking only on the window sills. Finally, look into expert house painting tips for 2025 and invest in a high-quality hybrid alkyd-acrylic topcoat for that rock-hard finish. These tools aren’t just for show; they are what allow local painting secrets elevate your space effortlessly by ensuring the chemistry of the paint matches the needs of the wood.
Take Your Sills From Sad to Sharp Today
You do not need to be a professional to get professional results. It just takes a bit of patience and the willingness to do the prep work correctly. When you finally see that smooth, glassy finish on your window sill, you will realize that mastering the art of house painting is incredibly rewarding. Your home deserves that extra bit of care, and your future self will thank you for not taking shortcuts. Go ahead, grab that scraper and start your transformation! Have you ever struggled with paint sticking to your window frame after it appeared to be dry? Let me know in the comments below!