

I still remember the smell of wet joint compound and the crushing disappointment that followed. It was my first big renovation, and I was so eager to see some color on those gray walls that I ignored the lingering damp patches. I slapped on a heavy layer of primer, thinking it would seal everything in. Within two hours, the paint started bubbling and peeling off the surface like a bad sunburn on a tourist. It was a sticky, expensive mess that taught me a lesson I will never forget: patience isn’t just a virtue in house painting; it is the absolute law. If you have ever felt that itch to just get it done, you are not alone, but rushing this step is the fastest way to ruin a perfectly good room. Today, I am going to share the exact signs I look for now to ensure every wall is bone-dry and ready for that first beautiful layer of color.
Why Rushing Your First Coat Is a Recipe for Disaster
Most folks don’t realize that drywall and joint compound act like a giant sponge. Even when the surface feels hard, there can be a significant amount of moisture trapped deep within the gypsum. When you seal that moisture in with paint, it has nowhere to go. This leads to issues like why your new drywall is drinking your paint so fast or, even worse, mold growth behind your beautiful new finish. I once made the mistake of thinking that because the mud turned white, it was good to go. It wasn’t. The center of those thick patches was still damp, and it eventually caused the texture to crack and flake. You want to master the art of house painting with these pro tips to avoid doing the same job twice. It is much easier to wait an extra twelve hours than it is to sand off gummy, half-dried paint and start over from scratch.
Is a Moisture Meter Actually Necessary for a DIYer?
You might be wondering if you really need to go out and buy a specialized tool just to paint a bedroom. While professionals often use moisture meters to ensure levels are below 12 percent (as noted by the International Association of Certified Home Inspectors), you can often get by with your senses if you know what to look for. Have you ever jumped the gun on a project and regretted it the next morning? It is a common frustration in local painting projects. Choosing the right materials helps too; understanding the difference between contractor grade and premium paint can change how you approach the drying process. In the following sections, I will break down the ‘cool to the touch’ test and how lighting can reveal hidden dampness that your eyes might miss at first glance.
Trust Your Knuckles and the Back of Your Hand
The most reliable tool you own is attached to your wrist. When joint compound is drying, it undergoes an endothermic reaction—it literally pulls heat from the air. If you press the back of your hand against a patch and it feels even slightly cooler than the surrounding wall, it is still holding water. I remember a basement project where the air was so thick you could practically drink it. The walls looked stark white, but they felt like a cold soda can. I ignored my gut, painted anyway, and ended up having to learn how to fix a run in your paint without starting over because the moisture caused the primer to slide right down the wall. If it feels cold, walk away.
Let a Flashlight Reveal What Your Eyes Miss
Standard overhead lighting is your enemy when checking for dryness. It flattens everything. To see the truth, grab a high-lumen work light and hold it flush against the wall, shining the beam across the surface. This ‘raking light’ highlights every shadow and microscopic bump. Damp spots often have a slight sheen or a different texture that only shows up under this intense, side-angled scrutiny. This is also the best time to check your sanding. If you see a ridge now, you will definitely see it after you apply your finish. Proper prep ensures you won’t have to worry about how to avoid those ugly roller marks on your ceiling or walls later on.#IMAGE_PLACE_HOLDER_B#
Speed Up the Clock Without Ruining the Finish
You can’t just bake a room dry. I once saw a DIYer blast a kerosene heater in a small bedroom thinking he would be painting in an hour. All he did was crack the mud. You want airflow, not high heat. Think of it like a clothesline; a gentle breeze is better than a stagnant sauna. Open the windows if it is dry outside, but if you are working in a humid climate, keep them shut and run a dehumidifier. This is especially vital if you realize why your new home needs a third coat of white paint, as each subsequent layer adds more liquid back into the substrate. Consistent air movement prevents the moisture from settling back onto the surface.
The Sanding Dust Test for Hidden Dampness
If you start sanding and the sandpaper ‘clogs’ or the dust comes off in little pills rather than a fine powder, stop immediately. That is a neon sign that the interior of the patch is still wet. I’ve ruined many expensive sanding pads by being impatient. When the mud is truly ready, the dust should be fine, light, and almost smoke-like. Once you hit this stage, make sure you thoroughly tack-cloth the area. Even if you have the trick for getting paint out of rough brick crevices, getting dust out of fresh drywall is a different beast entirely.
Respect the 48-Hour Rule for the Final Cure
Even after the paint is on, the drying process isn’t over. There is a major difference between dry to the touch and fully cured. I always tell people to follow the 48-hour rule for moving furniture back against new walls. If you push a heavy sofa against a wall that is 90% dry, you will end up with a permanent indentation or, worse, the fabric bonding to the latex. Patience during the prep phase pays dividends during the move-in phase.We’ve all heard the mantra that prep is everything, but here is a nuance most DIYers—and even some local painting crews—often miss: you can actually over-sand your walls. I have seen enthusiasts polish a patch until it is as smooth as glass, thinking they are achieving a gallery-grade finish. In reality, they are destroying the ‘tooth’ the paint needs to grab onto. According to the Master Painters Institute (MPI), proper adhesion requires a specific surface profile to ensure the coating doesn’t just sit on top but locks into the substrate. If you go too far with high-grit sandpaper, you will likely find yourself wondering why your office walls are scuffing within weeks of a repaint. The paint simply slides off because there was no mechanical bond. 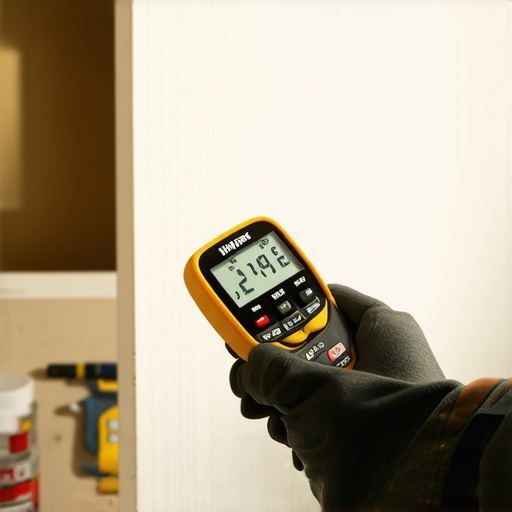
Stop Polishing Your Walls Like a Sports Car
When you sand drywall compound to a mirror-like sheen, you create a non-porous surface that rejects even the best primers. Think of the surface like a mountain range on a microscopic level; those tiny peaks and valleys are what hold the paint in place. The Painting and Decorating Contractors of America (PDCA) standards emphasize that the finish is only as good as the anchor profile created during the prep stage. To get it right, I recommend stopping at 120 or 150 grit for your final pass. Anything finer is usually overkill and risks total adhesion failure. This is also where many homeowners get burned when they hire the cheapest local painting bid. If the price seems too good to be true, you need to know how to tell if your painter is diluting the paint with water, as thin, over-worked paint on an over-sanded surface is a recipe for a peeling nightmare.
Does the Anchor Profile of Your Drywall Actually Dictate Paint Longevity?
Many advanced painters argue that the profile is more important than the paint brand itself. If the ‘anchor’ isn’t deep enough, the paint film remains under tension as it cures, eventually pulling away from the wall at the slightest impact. This leads to the ‘oops’ factor of chemical burn. If you are applying heavy layers of mud, you must also consider the pH balance. Fresh joint compound is often highly alkaline, which can ‘burn’ the pigment in your topcoat if it isn’t neutralized or properly sealed. Have you ever fallen into this trap? Let me know in the comments.
The Invisible Chemistry of a Rainy Day
Beyond the sanding, we must respect the room’s micro-climate. Most people think as long as the room isn’t freezing, the paint will dry. But ‘dry to the touch’ and proper ‘film formation’ are two different animals. If the humidity is too high, the water in the latex can’t evaporate fast enough, yet the solvents do, leaving you with a brittle, gummy mess. This is precisely why you should never paint your kitchen cabinets during a rainy week. Even if you use the only way to get a sharp line between your wall and woodwork, it won’t matter if the paint fails to cure at a molecular level. To truly master the art of house painting with these pro tips, you have to treat your project like a science experiment, respecting the physics of the wall as much as the color on the brush.If you treat your wall like a canvas, your brush is your most vital instrument. I used to buy those bulk packs of cheap polyester brushes, thinking I was saving money. I wasn’t. Those low-grade bristles shed like a golden retriever, leaving permanent hairs in the finish that look like spider legs once the paint dries. Now, I swear by the Purdy XL series. The blend of Tynex and Orel bristles holds more paint and releases it more evenly, which is essentially the only way to get a sharp line between your wall and woodwork without having to redo your edges five times. When you use a high-quality tool, you realize that the brush is doing half the work for you. To keep these tools in top shape, I never finish a day without using a stainless steel brush comb. It pulls the dried paint from the ‘heel’ of the brush, where it usually clumps up and ruins the shape. According to the SSPC SP-1 standards for surface preparation, even the smallest amount of oily residue or dried paint flakes can compromise the cross-linking of modern acrylic polymers, leading to premature failure. 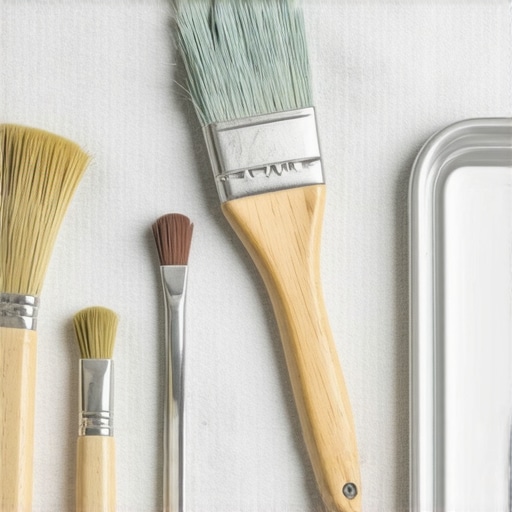
How do I maintain my freshly painted walls over time?
The longevity of your project depends entirely on how you treat the paint in the first three months. Even though it is dry to the touch, it takes weeks for the resin to fully harden. To keep things looking fresh, avoid using harsh chemicals; a simple drop of dish soap and a microfiber cloth will prevent you from seeing why your office walls are scuffing within weeks of a repaint. If you have an exterior project, you must learn how to maintain your newly painted exterior for ten years or more by rinsing off salt and pollen at least once a season. It is also wise to unlock the power of professional painting for a stunning home by keeping a small mason jar of touch-up paint for every room. This avoids the ‘patchwork’ look that happens when you try to use a five-year-old gallon of paint that has separated in the garage. Looking ahead, the industry is moving toward graphene-infused coatings. These materials are incredibly thin but offer massive durability and thermal conductivity, potentially helping your walls regulate room temperature. For now, focus on the basics of maintenance to protect your investment. I strongly encourage you to try the brush comb trick on your next project; it will turn a three-project brush into a lifetime tool. You can find more details on this in my guide on how to master the art of house painting with these pro tips and ensure your home stays looking like it was done by a crew of experts.
Hard Truths About Prep That I Learned the Hard Way
Reflecting on my early mistakes, I realized that house painting is 90% psychological. The urge to see the finished color is so strong that we often trick ourselves into seeing dry walls when they are still dangerously damp. One lightbulb moment for me was realizing that environmental control is more important than brush technique; if you do not control the airflow and humidity, even the most expensive paint will eventually fail. Another realization? Your local painting project should never feel like a race. I used to think a fast job was a good job, but now I know that the best results come from those who respect the ‘waiting game.’ Learning local painting secrets to elevate your space effortlessly often just means having the discipline to let the primer sit overnight regardless of what the label says.
#IMAGE_PLACEHOLDER_E#
The Specific Gear That Guarantees a Pro Finish
I have spent thousands on gadgets over the years, but there are only a few I actually pack for every single job. First, a dedicated moisture meter is a game-changer because it removes the guesswork and tells you exactly when the substrate is ready for coating. I also recommend a high-quality hand-masker for protecting floors and trim—it saves hours of frustration compared to loose plastic and tape. Finally, investing in a sturdy extension pole is vital for anyone trying to master the art of house painting with these pro tips, as it prevents back strain and ensures even pressure across the entire wall. I trust these tools because they have survived hundreds of hours on site, providing insurance against common failures like lap marks and physical fatigue.
It Is Time to See Your Home in a New Light
There is a unique sense of pride that comes from standing back and seeing a room transformed by your own hands. Do not let the fear of a few drips or a long drying time stop you from starting your next project. Whether you are tackling a DIY weekend or want to understand why local painting matters to boost your homes value, the knowledge you have gained here puts you miles ahead of the average homeowner. Your walls are the backdrop of your daily life, and they deserve the care of a thoughtful professional approach. Now that you are equipped with the right techniques, you can transform your home with expert house painting tips for 2025 and beyond. Have you ever jumped the gun and painted a wall before it was truly ready? Let me know about your biggest painting ‘oops’ in the comments below!