

I remember standing in my driveway five years ago, feeling like a total weekend warrior king. I had just rented a commercial-grade pressure washer with a motor that sounded like a jet engine. My goal was simple: get the grime off my cedar siding before I dove into mastering the art of house painting. I cranked that dial to the maximum setting, thinking I would blast through the chores in half the time. Ten minutes later, I wasn’t just washing away dirt. I was literally carving deep, jagged grooves into my expensive wood. It looked like a giant cat had used my house as a scratching post. I had made a classic mistake, and today, I want to make sure you don’t do the same. We are going to look at why high-pressure water is the absolute enemy of your home’s exterior and how you can get a professional-level clean without causing thousands of dollars in damage. Have you ever noticed your wood looking ‘fuzzy’ or splintered after a deep clean?
High pressure turns your wood siding into a soggy sponge
When you hit wood with a high-PSI stream, you aren’t just cleaning the surface. You are actually destroying the lignin, which is the natural glue that holds wood fibers together. According to the USDA Forest Products Laboratory, high-pressure water can degrade the wood surface so severely that it loses its ability to hold a finish. This is one of the biggest dangers of pressure washing wood siding that most homeowners ignore until it is too late. Once those fibers are blown open, your siding becomes incredibly porous. It drinks up moisture like a thirsty hiker, and that trapped water is exactly the reason your exterior paint bubbles just a few weeks after you finish the job. I learned the hard way that more power doesn’t mean a better result; it usually just means a bigger repair bill.
Is soft washing really worth the extra effort?
Some people think ‘soft washing’ is just a fancy term contractors use to charge more money, but the science is real. Instead of relying on brute force, we use specific cleaners to kill mold and mildew at the root. If you try to blast mold off with high pressure, you’re often just pushing the spores deeper into the wood grain. This sets you up for a cycle where the mold comes back even faster. If you want to maintain your newly painted exterior for a decade or more, you have to treat the wood with respect. Using the wrong technique is why so many people end up painting over peeling paint and wondering why it won’t stick. Let’s get into the actual steps to prep your home safely and effectively.
Kill the Mold Before You Pick Up the Hose
Instead of blasting dirt away with raw power, you need to chemically neutralize the organic growth that loves to hide in the shady corners of your siding. I usually mix a solution of about 1% to 2% sodium hypochlorite with a surfactant—essentially a specialized soap that helps the mixture cling to vertical surfaces. Last summer, I worked on a historic home where the north side was thick with green algae. If I had used a pressure washer, I would have simply shredded the old timber and pushed spores deeper. Instead, by applying the cleaning agent with a low-pressure pump sprayer, I watched the algae dissolve in minutes. This sterile surface is a foundational part of expert house painting advice for 2025, ensuring your new coat isn’t sitting on a layer of living organisms.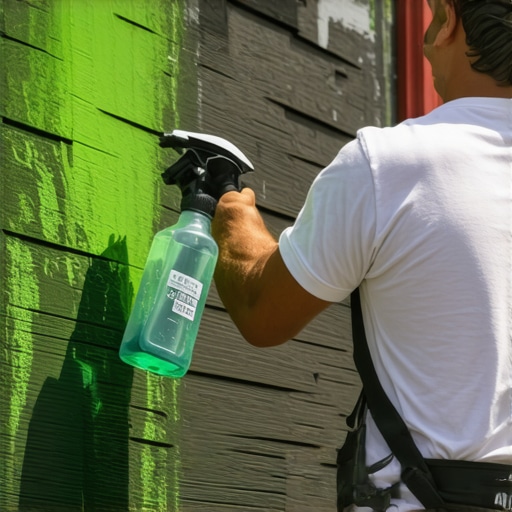
Protect Your Plants From the Cleaning Solution
One mistake I see homeowners make constantly is forgetting about their landscaping. Chemicals that kill mold are equally effective at killing hydrangeas. Before you start the application, soak every plant, bush, and patch of grass near the house with fresh water. This creates a protective film on the foliage so any overspray simply slides off. It is the exact same mindset used when learning how to protect your perennials during exterior house painting. I once spent two hours pre-wetting a client’s prize-winning garden before even touching the siding, and it was the best insurance policy I ever ‘bought.’ Keep a garden hose running nearby to rinse the leaves again immediately after you finish a section of the wall.
Why Low Pressure Always Wins the Day
Once the cleaning solution has had about ten minutes of ‘dwell time’—don’t let it dry!—it is time for the rinse. You do not need a high-PSI blast for this stage. A wide 40-degree nozzle tip held at a consistent distance of 12 to 18 inches is more than enough to wash away the residue. You are essentially assisting gravity in pulling the dead mold and loosened grime down to the ground. Using excessive force is a leading reason why your exterior caulk is falling out of the gaps already; the high pressure forces water behind the boards, causing the wood to swell and reject the sealant. Work in steady, overlapping horizontal sweeps, starting from the top and moving downward to prevent dirty streaks from staining the lower sections.
Choose the Right Gear for Your Siding Type
Different textures require different levels of finesse. If you are dealing with rough-sawn cedar, for example, even a moderate rinse can ‘fur’ the wood if you linger too long in one spot. When you eventually transition to the coating phase, you will want to select the best roller nap for rough exterior cedar siding to navigate those ridges. My personal rule of thumb is that if you can feel the water’s impact vibrating through your boots, you are likely too close or the pressure is too high. Think of the process as a controlled, heavy rainstorm rather than an industrial cutting tool. This level of care is what separates a DIY project from the local painting secrets that professionals use to achieve a flawless, long-lasting finish.I often hear neighbors bragging about how they put ‘four thick coats’ on their deck or trim to make it last a decade. In the world of professional local painting strategies, that is actually a recipe for disaster. If the paint film becomes too thick, it loses its ability to breathe and flex with the wood fibers. This is a common reason why your new trim paint is already chipping off—the weight of the paint itself, combined with its lack of elasticity, causes it to pull away from the substrate during seasonal expansion and contraction. Most people assume ‘more is better,’ but the real secret lies in film thickness, not coat count.
Does Your Siding’s pH Balance Determine Paint Failure?
This is where we move from weekend warrior to true expert. Most people rinse their siding and think they are done, but if you used a heavy bleach solution (which is highly alkaline) and did not neutralize it, you have left a chemical residue that reacts with the paint. According to the Master Painters Institute (MPI), a high pH environment can cause ‘saponification’—which basically means your paint turns into soap on the wall. This is a primary reason the reason your exterior paint bubbles even if the wood appeared dry to the touch. If you see white, chalky runs on your trim after a rainstorm, your pH is likely off, and no amount of expensive topcoat will save it.
How much do you really know about the moisture trapped in your trim?
The biggest ‘oops’ factor usually hits during the transition between cleaning and painting. I have seen homeowners spend days cleaning only to ignore why your exterior window trim is rotting under the paint because they did not check the internal moisture content. You need a digital moisture meter. If that wood is over 15% moisture, don’t even open the can. I once saw a DIYer try to save money by diluting the paint with water to make it ‘flow’ better on a hot afternoon. All he did was destroy the resin-to-pigment ratio, ensuring the finish would fade and crack within six months. 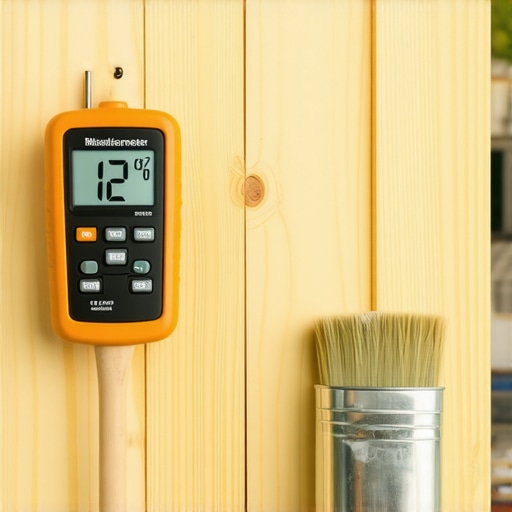
Don’t Ignore the Invisible Glaze on New Wood
If you are replacing boards before painting, you might run into ‘mill glaze’—a shiny, compressed surface caused by high-speed planer blades at the lumber mill. If you don’t sand this off, your paint will literally slide off in sheets. It is the same reason why your new home needs a third coat of white paint sometimes; the surface simply isn’t grabbing the pigment correctly. Understanding the difference between contractor grade and premium paint is helpful, but if you’re painting over mill glaze or high-pH residue, the price of the bucket won’t matter. Have you ever fallen into this trap of over-painting or missing the ‘invisible’ prep steps? Let me know in the comments.I have spent years testing different setups, and I’ve realized that the difference between a “good” job and a local painting secrets level of finish often comes down to the gear you keep in your truck. Most DIYers go to the big-box store and grab the cheapest polyester brush they can find. That is a mistake. I personally swear by the Wooster Alpha or the Purdy Clearcut. These brushes have a unique blend of synthetic filaments that hold more paint and release it more evenly, which is how you avoid those dreaded brush marks. If you want to unlock the power of professional painting for a stunning home, you have to treat your tools like an investment, not a disposable one-time expense.
Stop Guessing and Start Using a Moisture Meter
I mentioned this earlier, but I cannot stress it enough: you need a moisture meter. I use the Wagner Meters Orion series because it’s pinless and won’t leave holes in your fresh siding. The Society for Protective Coatings (SSPC) PA Guide 10 emphasizes that moisture is the primary cause of coating failure on wood. If the internal humidity of the wood is high, no primer in the world will save you. By checking the levels before you start, you’re practicing pro tips to master the art of house painting that the professionals use to guarantee their work. #IMAGE_PLACE_HOLDER_D#
How do I maintain my exterior paint over time?
Maintenance isn’t just about a fresh coat every ten years; it is about the “walk-around.” Every spring, I take a soft-bristled brush and a bucket of mild detergent—nothing too aggressive—and I gently wash the dust and pollen off the shady sides of the house. This prevents the mold spores we discussed earlier from ever getting a foothold. It is the single most effective way to maintain your newly painted exterior for ten years or more. If you see a small crack in the caulk, fix it immediately before water gets behind the board and starts the rot cycle.
Expect Smarter Paint Technologies by 2030
Looking ahead, the industry is moving toward “smart” coatings. We are already seeing the rise of IR-reflective pigments that keep your home cooler in the summer, and I predict that within five years, self-healing polymers will become standard in high-end exterior paints. These allow microscopic scratches and cracks to “heal” themselves when exposed to sunlight. This is part of the ultimate guide to house painting for the next generation of homeowners. My best advice for right now? Go buy a digital moisture meter today. It is the one tool that will save you from the biggest disaster in house painting.
The Hardest Lessons I Learned the Hard Way
Over the years, I have realized that the most expensive mistakes are not the ones you make with the paintbrush, but the ones you make with the hose. First, never underestimate the sun’s power to dry your cleaning agents too fast; once that bleach solution dries on the siding, you have created a chemical film that is a nightmare to remove. Second, I have learned that a moisture meter is my only true source of truth—if it says ‘no,’ I walk away for another 24 hours regardless of the schedule. Third, the ‘perfect’ weather window is often a myth; you have to learn to work with the humidity rather than against it. Finally, if you want to find innovative house painting ideas to refresh your living space, you must start with a clean, dry canvas. Without it, the best design ideas in the world will not last through the first winter.
The Gear That Actually Lives in My Truck
I do not believe in buying every gadget on the shelf, but three things are non-negotiable for my workflow. The Wagner Orion Pinless Moisture Meter is my number one recommendation because it protects the wood from puncture marks while giving an instant, accurate reading. For the actual application, I always reach for Purdy Clearcut Elite brushes; they provide the stiff filaments needed to handle heavy exterior coatings without losing their shape. Lastly, I frequently reference the Master Painters Institute (MPI) manuals. These are not just for contractors; they provide the scientific standards that help you understand expert house painting tips for 2025 and beyond. These tools remove the guesswork and replace it with professional confidence.
Take the Leap and Transform Your Curb Appeal
Standing in front of your home with a pressure washer can feel empowering, but true mastery comes from knowing when to dial it back and let chemistry do the heavy lifting. When you prioritize the health of your siding and the chemistry of your prep work, you are not just painting a wall; you are building a long-term shield for your family. This is why local painting matters—it preserves the structural integrity of your most valuable asset while making it look stunning. Don’t be afraid to take your time. A slow, methodical start always leads to a faster, more professional finish. Have you ever discovered moisture or mold hidden behind what looked like ‘clean’ siding? Let me know your prep stories in the comments below!