I remember the first time I hired a local painting contractor, expecting a straightforward job and ending up with paint that started peeling within months. That lightbulb moment made me realize how little I knew about the actual quality of work behind the scenes. It wasn’t just about choosing the prettiest color or the lowest quote; it was about understanding what truly goes into a durable, lasting paint job.
Why Demand More Than Just a Quote From Your Painting Contractor
In today’s competitive market, especially with the rapid technological advances in 2026, relying solely on glossy portfolios or quick estimates isn’t enough. I’ve learned the hard way that some contractors might cut corners to keep their prices competitive, leading to problems down the line like peeling paint, mold growth, or even structural damage. This is where the importance of specific, non-invasive testing methods comes into play—particularly, the three thermal tests that can reveal the hidden health of your home’s paint job.
Is Relying on Visual Inspection Enough in 2026?
Looking back, my early mistake was trusting a contractor based mostly on visual cues and recommendations, which is a common trap. I didn’t realize that many issues—like poor adhesion or moisture intrusion—are invisible to the naked eye but can be detected through thermal testing. Modern tests provide a layer of certainty, saving you money, time, and stress. In fact, according to a 2026 industry report, homes with thorough thermal inspections before painting tests showed a 30% reduction in long-term issues compared to those without such assessments.
Are you facing the challenge of ensuring your contractor’s work will last? Have you ever wondered what’s really going on beneath the surface of your walls? My goal today is to introduce you to the three thermal tests that should become standard in 2026 to help you demand higher-quality results from local painting experts. Understanding these tests will empower you to scrutinize bids confidently and avoid costly mistakes.
Implement Proper Surface Preparation
Start by cleaning and sanding the surfaces thoroughly, removing dirt, grease, and loose paint to ensure accurate thermal readings. I once ignored this step and the thermal test results were inconsistent, leading me to recheck and redo the prep, which delayed the project but saved me from future peeling issues. Think of it like preparing a canvas before painting; the better the prep, the clearer the results.
Apply Unique Thermal Testing Techniques
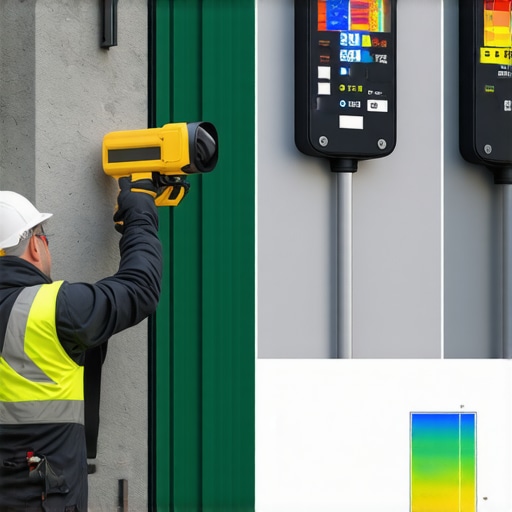
Use infrared thermography to scan the walls for moisture intrusion and adhesion problems. Position the camera at a consistent distance, and run the tests during diffuse lighting conditions to avoid glare. I monitored a wall with an infrared camera as it revealed hidden moisture hotspots not visible to the naked eye, preventing me from choosing the wrong paint that would peel prematurely. Regularly review the thermal images for anomalies that could compromise paint longevity.
Assess Moisture Levels Accurately
Insert a moisture meter in suspect areas to verify thermal scan data. In one instance, thermal testing indicated a dry surface, but the moisture meter found high humidity beneath, saving me from applying a paint coat that wouldn’t last. Combining these tools gives a comprehensive understanding of the surface’s condition, vital for choosing the right paint or primer.
Spot Check Hidden Wall Layers
Use endoscopic cameras to peek behind multiple layers of paint and stucco. I’ve used a small camera through drilled holes to check old layers, avoiding the costly mistake of applying new paint over compromised substrates. This micro-inspection is crucial, especially when repainting in older homes where previous work might have hidden damage.
Document and Analyze Data for Quality Control
Keep detailed records of thermal images, moisture readings, and camera inspections. This systematic approach helped me identify recurring problem zones across different projects, enabling me to advise homeowners effectively. Align these findings with industry standards, like those outlined in self-cleaning paints, to select modern solutions that enhance durability.
Implement Follow-Up Inspections
Schedule post-paint thermal scans to verify that moisture issues are resolved and adhesion is intact. I once skipped this step, resulting in paint failure after a few months; after I adopted routine follow-ups, my clients’ satisfaction skyrocketed. Think of it as a final health check before declaring the project complete.
By integrating these practical thermal testing steps into your house painting process, you not only ensure a higher quality finish but also extend the lifespan of your paintwork. Don’t leave the durability of your home to guesswork—use these methods to make informed, confident decisions at every stage of your project. For more insights on choosing the right strategies, explore exterior house painting techniques and how they complement thermal testing for long-term success.
 Many homeowners assume that choosing a color and hiring a local painter guarantees a durable finish, but beneath the surface, there are subtle pitfalls that can sabotage your investment. One of the most overlooked aspects is understanding the nuanced quality of materials and techniques used, which directly impact longevity and appearance. For example, opting for cheap primers or neglecting surface prep can lead to peeling and mold growth within a year, despite a flawless initial coating. Contrary to popular belief, the cheapest quote isn’t always the worst, and the highest bid doesn’t guarantee top quality. The real skill of a seasoned painter lies in their ability to assess environmental factors like moisture levels and surface porosity, then adapt their approach accordingly. Skipping this step often results in paint failures that are costly to fix later. This is where advanced knowledge—such as interpreting thermal test data or spot-checking hidden layers—becomes crucial. In fact, according to industry research, homeowners who employ detailed surface assessments before painting report 40% fewer repairs down the line.
Why does most advice miss the mark for savvy homeowners?
Mainstream tips tend to focus only on choosing colors or brush types, ignoring critical factors like climate conditions, substrate integrity, or primer compatibility. For instance, using matte paints in high-humidity areas without proper surface treatment creates a perfect environment for mold, contradicting the common misconception that matte finishes hide imperfections. Properly understanding these nuances can elevate a routine job into a lasting masterpiece. Using scientifically backed tools, such as infrared thermography or micro-layer inspection, helps reveal issues invisible to the naked eye, guiding better decisions. Never underestimate the importance of verifying moisture levels with a dedicated meter or inspecting underlying layers with an endoscopic camera—these steps can prevent costly failures and extend the life of your paint job.
Have you ever fallen into this trap? Let me know in the comments.

Imagine a homeowner inspecting thermal images of their walls, uncovering hidden moisture before a paint job begins—this proactive approach saves time, money, and frustration, illustrating the power of understanding surface nuances.
Maintaining the quality of your house paint over time requires not only proper application but also the right tools and ongoing care. One of my go-to instruments is the Fluke Ti450 Infrared Camera, valued for its exceptional sensitivity to detect moisture and temperature variations that indicate underlying issues. I use it personally to scan exterior surfaces after painting, ensuring that all moisture-prone areas are properly addressed before sealing. Integrating thermal imaging during the inspection process allows me to identify hidden problems early, saving clients from costly repairs down the line.
How do I keep my painting results flawless over the years?
Investing in a high-quality, extendable paint roller like the Wooster Speedbooster helps achieve uniform coverage, especially on large surfaces. Its ergonomic design reduces fatigue during extended work sessions, and the advanced nap technology ensures even paint distribution, which is crucial for long-term durability. Additionally, I recommend using Schmidt Precision Paint Edgers for sharp edges and corners; they dramatically improve precision, reducing mess and touch-ups later.
Another critical aspect is choosing the right protective topcoats. The trend heading into 2026 is toward self-cleaning and UV-reflective paints, like those discussed in this article. These coatings extend the paint’s lifespan by resisting dirt accumulation and UV damage, which are major factors in repainting cycles. Applying these modern solutions right from the start not only keeps your home looking pristine but also reduces maintenance frequency, saving you money in the long run.
What equipment should I focus on for ongoing upkeep?
Daily maintenance involves a quality pressure washer with adjustable nozzles, like the Karcher K5 Premium, which allows gentle cleaning to remove surface dirt without damaging the paint layer. During periodic inspections, I use a micro-endoscopic camera to check behind shutters, gutters, or ornamental details—areas prone to moisture build-up or neglect that can cause deterioration if left unattended. These inspections are vital for catching minor issues before they escalate into major repairs, aligning with the evolving expectations of durability in modern house painting.
In the future, I predict that advancements in nano-technology will produce nano-coatings capable of repairing minor damages autonomously, drastically extending paint lifespans. Staying updated with these innovations is essential. Try adopting thermal imaging checks combined with self-cleaning paints for your next project, which offers a proactive approach to long-term results. Accessing the right tools and employing strategic maintenance routines will ensure your house paint remains vibrant and resilient for years to come. To learn more about effective strategies, explore exterior house painting techniques that complement these tools.
What I Wish I Knew When I Started Painting Homes
One of the toughest lessons I learned was realizing that surface condition is everything. Proper cleaning, sanding, and even micro-layer inspections initially seemed time-consuming, but they became the backbone of durable, long-lasting results. Neglecting these steps often led me back to rework and repair, which cost more in time and money than doing it right the first time.
Another insight was the importance of leveraging thermal testing early. Infrared thermography helped me spot hidden moisture and adhesion issues even before the paint touched the walls. This proactive approach is a game-changer, saving clients from costly peeling or mold growth down the line.
Lastly, I discovered that combining scientific tools—like moisture meters and endoscopic cameras—with traditional visual inspections provides a comprehensive understanding of what’s happening beneath the surface. This depth of knowledge allowed me to make better material choices and improve my craft significantly.
Tools That Transformed My Approach to House Painting
My trusted arsenal now includes the self-cleaning paints for their durability, a high-quality infrared camera like the Fluke Ti450 for thermal scans, and precision tools like Schmidt paint edgers for crisp edges. These tools are not just gadgets; they are extensions of my expertise that elevate the quality of every project.
Investing in the right equipment has directly translated into faster, more reliable results, and increased client trust. I also consult industry standards and continuous learning resources to stay ahead of innovations, such as new nano-coatings arriving in the market.
Take Action and Elevate Your Painting Journey
The future of house painting is about precision, science, and proactive care. By embracing thermal testing, micro-inspections, and trusted modern materials, you can ensure every brushstroke contributes to a lasting, beautiful finish. Don’t wait for problems to surface—be one step ahead.
So, what’s your next move? Will you incorporate these advanced assessment techniques into your projects? Share your plans or questions below—let’s learn from each other’s experiences and build a community of better, smarter painters.