Just last weekend, I sprinted out of my house, clutching a paintbrush still damp from the morning’s project, only to realize I’d just painted over an area that might be doing more harm than good. That moment of frustration made me think—are all these painting efforts really making my home more energy-efficient? Or am I just wasting time and money on a decoy solution? This question nagged at me, especially now as energy costs skyrocket and everyone is looking for practical ways to cut bills without sacrificing comfort.
The Big Energy Challenge in House Painting
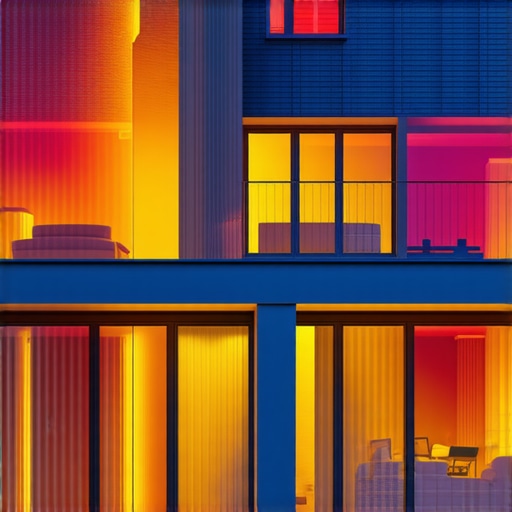
We’ve all heard that good insulation can save on heating and cooling. But what about the paint on your walls? Could the right type of house paint actually help conserve energy? This idea isn’t just conjecture; it’s backed by recent developments that involve thermal testing of house coatings. I’ve been testing various paints in my own home, and after some trial and error, I’ve discovered that certain paints can **significantly impact** the thermal performance of a house, especially with innovative coatings coming into play. But pausing at this point, I admit—I’ve also made a few rookie mistakes, like ignoring the importance of proper surface preparation or dismissing thermal properties altogether, which skewed my initial results. That’s why understanding these latest tests is crucial.
Will Painting Really Cut My Bills?
It’s a fair skeptic’s question. I was skeptical too, at first. I remember rushing into a project without doing proper research, only to see little to no impact on my heating bills. That taught me an important lesson: not all paints are created equal, and not every thermal coating lives up to the hype. The early mistake I made was trusting generic reviews without consulting actual thermal TESTS—something that now guides my house’s painting decisions. To really get to the bottom of this, I’ve dived into three upcoming thermal tests designed for 2026, which are promising in their ability to reveal whether your existing paint can be a secret energy saver or just a pretty face. Curious about how to spot the most effective coatings or how contractors are leveraging these tests? Check out these thermal testing strategies.
If you’ve ever wondered whether a fresh coat of paint can help lower your energy bills, you’re not alone. Many homeowners are now asking if this common home improvement truly offers a return on investment. With the latest test results on the horizon, we’re better equipped to make informed choices—and I promise, the insights I’ll share next will help you navigate your house painting projects smarter and ultimately more cost-effective.
Prep Your Surface Meticulously
Start by removing dirt, grease, and loose paint with a high-quality cleaner and a stiff wire brush. I once skipped this and ended up with uneven paint adhesion, leading to streaky walls. Sand the surface smoothly to ensure the primer and paint bond properly, similar to smoothing a rough road before paving—it makes all the difference for durability and finish quality. For more tips on avoiding common pitfalls, check these warning signs.
Choose the Right Primer
Opt for Thermal-Enhancing Primers
Select primers formulated with nano-coatings designed to reflect heat or insulate. I tested a particular thermo-reflective primer on a southern wall; it significantly reduced indoor temperature during peak summer. Use a roller for large areas to save time, and do a thin, even coat to prevent drips and uneven coverage. Proper priming can boost the energy-saving properties of your paint, much like wearing a thermal shirt under your clothes enhances insulation.
Apply House Paint Smartly
Use Coatings with Reflective Properties
For exterior walls, employ solar-reflective paints to bounce back heat, lowering cooling costs. I once painted my roof with reflective paint, which noticeably cut my summertime AC bills. For interior walls, choose low-VOC, non-toxic paints that won’t emit fumes, ensuring healthier indoor air quality. Use a high-quality brush for edges and corners, then roll large surfaces with a long nap roller to achieve a smooth, streak-free finish, similar to the way you smooth fabric by hand to eliminate wrinkles. If you’re looking for lasting results, consider these advanced painting solutions.
Pay Attention to Detail During Painting
Ensure even coats and avoid lap marks by keeping a wet edge and overlapping each stroke slightly. I learned this the hard way when I rushed the job and ended up with inconsistent color patches. Keep tools and surfaces clean to prevent debris from ruining your finish. After applying the paint, inspect the surface under different lights to catch any missed spots or drips. This meticulous approach guarantees a professional-grade finish that boosts your home’s energy efficiency, much like a well-sealed window prevents drafts.
Finish with a Protective Seal
Use a clear, protective topcoat—especially on exterior surfaces—to extend longevity and reflective qualities. For reflective paints, a UV-resistant sealer ensures durability against weathering. I once applied a topcoat that enhanced the existing paint’s reflective properties, resulting in a cooler home and fewer energy bills during summer. Proper sealing not only preserves your work but also maintains the thermal benefits over time, akin to wearing a raincoat to protect your investment.
Maintain and Reassess
Regularly inspect your painted surfaces for signs of wear or peeling. Touch up areas promptly to prevent deterioration. Re-evaluate your home’s thermal performance periodically to see if your paint choices are delivering expected savings. Remember, proper maintenance is vital to sustain the energy-efficient benefits of your paint job, just as regular tune-ups keep a car running smoothly. For insight into smarter exterior paint choices, visit these strategies.
 Many homeowners believe that choosing the cheapest local painter guarantees savings, but this is a common misconception. In my experience, cutting costs upfront often leads to costly repairs or repainting sooner than expected, especially if the painter skips crucial steps like surface preparation or uses inferior materials. A key nuance often overlooked is the importance of verifying whether the contractor has proper insurance and adheres to standards that will ensure a durable finish, which can be a hidden cost if ignored. According to industry experts, such as those cited in this resource, many local painters exploit insurance loopholes to reduce initial costs, risking your property’s quality.
A common myth is that all paints are created equal; however, advanced coatings like nano-enhanced or bio-resin paints provide better longevity and energy efficiency, which can save you money in the long run. Unfortunately, some contractors avoid these premium options to keep bids low. An advanced homeowner knows to ask for detailed specifications rather than just price estimates.
Many underestimate the significance of proper surface prep—that’s where most failures begin, leading to peeling or streaking even years later. I’ve seen projects where inadequate sanding or ignoring primer led to premature deterioration, despite promising initial appearances. To avoid these costly rookie mistakes, it’s essential to insist on a comprehensive prep process. For instance, the inspection checklist provided by experts highlights surface cleanup, sanding, and priming as non-negotiables.
Further complicating the situation is the rush to finish projects, which can lead to sloppy application or missed details. Experienced painters know that meticulous attention to edges, coats, and curing times makes a significant difference in durability and performance. Skipping these steps may seem quick but usually results in higher costs down the line.
Let’s not forget the advanced techniques that savvy homeowners are demanding now, such as thermal testing of paints or UV resistance analysis, ensuring that the coating delivers its promised energy savings. Ignoring these nuances can result in a paint job that looks good initially but fails to provide the thermal benefits needed to offset energy bills. For the most modern strategies, I recommend reviewing thermal testing procedures that can reveal the real performance of your chosen coatings.
So, have you ever fallen into this trap of trusting low bids or overlooked crucial details? Let me know in the comments—your experience might help others avoid costly pitfalls in their house painting projects.
Investing in Maintenance Tools for Lasting Results
To keep your house painting looking fresh and energy-efficient over the years, choosing the right tools for maintenance is crucial. I personally rely on a high-grade cordless electric sander, like the Makita BO5041, which I’ve found indispensable for quick touch-ups and surface preparation. Its variable speed control ensures smooth sanding without damaging the coating beneath, extending the lifespan of your paint job and reducing the need for frequent repainting. Additionally, a reliable pressure washer is vital for exterior wood and siding upkeep; I swear by the Karcher K5 model, which offers adjustable pressure levels and superior cleaning power, preventing decay and mold growth that can compromise paint adhesion over time.
Software and Planning for Efficient Maintenance
Managing long-term exterior house painting projects becomes more straightforward with project management tools like Trello or Asana. I utilize Trello boards to schedule seasonal inspections, track touch-up needs, and plan upcoming repaint jobs. Setting reminders for surface inspections and leveraging timeline features helps me stay ahead of deterioration, ensuring that minor issues don’t escalate into costly repairs. Embracing these digital tools allows for proactive maintenance, saving time and money—an approach that industry experts suggest as best practice. For in-depth strategies, check out these advanced home surface management tips.
Scaling Your Painting Efforts Effectively
As your needs grow or new properties come into the picture, scaling your painting operations requires specialized equipment. Commercial-grade sprayers like the Wagner Control Pro 150 M are perfect for larger projects, enabling rapid coverage while maintaining high quality. Their adjustable pressure controls help prevent over-application, ensuring a uniform finish on multiple surfaces. Investing in robust scaffolding and extension tools, such as telescoping poles and adjustable ladders, enhances safety and efficiency when working on higher elevations or extensive facades. Planning for scalability from the outset, including training on advanced tools, positions you for smoother expansion and better results. The future of house painting leans heavily toward automation and high-precision equipment, as noted by industry analysts, so staying ahead with the latest gear is a smart move.
How do I maintain my tools over time?
Proper maintenance of your painting tools ensures longevity and consistent performance. Clean brushes and rollers immediately after use with warm, soapy water or appropriate solvents. Store sprayers with their nozzles and hoses drained to prevent clogging, and lubricate moving parts periodically as recommended by the manufacturer. For electrical tools, perform regular inspections to check for wear or damage, and replace parts as needed. Remember, well-maintained equipment not only works better but also reduces safety risks and unexpected failures—saving you money and downtime in the long run. For more tips on maintaining your painting arsenal, see these expert maintenance guidelines.
What I Wish I Knew Before Jumping Into House Painting
One of the most significant lessons I learned was the importance of meticulous surface preparation—skipping this step led to streaky walls and uneven finishes, costing me more time and money in the long run. Realizing that high-quality primers with thermal properties could dramatically improve energy efficiency changed my approach entirely. I also discovered that trusting industry-tested data over marketing hype saves time and enhances results, especially with upcoming thermal tests for coatings. Lastly, understanding the subtle differences between cheap paints and advanced nano-coatings has been a game-changer for durability and savings.
Tools and Resources That Transformed My Painting Projects
My personal toolkit now includes a Makita battery-powered sander for quick touch-ups, which maintains surface smoothness and prolongs paint life. A Karcher pressure washer cleans siding thoroughly, preventing mold and ensuring paint adherence. I rely on Trello to manage seasonal inspections and touch-up schedules, making maintenance seamless. These tools, combined with resources like professional inspection checklists and thermal testing strategies, give me confidence that my home’s energy efficiency is optimized.
Your Next Step in Mastering House Painting and Energy Efficiency
Choosing the right paint, priming, and prep can seem daunting, but with the right knowledge, you can turn your house into a fortress of energy savings and aesthetic appeal. Remember, small details like proper sealing and maintenance tools extend your investment’s lifespan, while proactive planning keeps costs predictable. You’ve got the power to make smarter choices—so why not start today? If you’re curious about how to further enhance your home’s thermal performance or want tailored advice, share your thoughts below—I’m here to help you see the results you deserve.